
847-966-1044


847-966-1044
![]()
![]()
![]()
![]()
![]()
![]()
![]()
Internet connection problems
North Shore PC would like to make your computing experience fun and rewarding as soon as your system arrives at it's new home. All NSPC custom built systems are pre-tested and ready to run "right out of the box". Because we install all our systems personally ( within 10 miles), we ensure complete satisfaction. This on-line manual will supply you with the basic knowledge needed to setup and begin using your new NSPC computer yourself. In the event it ever needs to be moved or upgraded this knowledge can be invaluable. Modern Computers and software are capable of many things beyond the scope of this manual. Further information can be found in the manuals that accompany your computer or your local bookstore, library or on the Internet.
![]()
The first thing to do is find a good location for your system. This must be done carefully. Computers can fit just about anywhere, however many places are better than others. Try to find a place that has very little dust, a steady temperature throughout the winter and summer months, and plenty of room for your monitor and printer to breath and cool. You may even want to leave some extra room for any peripherals you may acquire in the future, like a scanner or second printer. Computers and most electronic equipment will last longer if the circuit boards inside them are kept at a steady temperature and never allowed to over heat or suffer surges or sags of electricity called spikes and brownouts respectively. For this reason, NEVER plug your computer into a socket on the same circuit as an air conditioner or other major appliance. We recommend battery backup devices for all desktop computers. Battery backup systems are small and inexpensive and will run your system long enough to shut down properly during short power outages. Try not to place your system in the path of direct sun light. The the monitor can degrade and fade the picture while the heat generated by the sun can actually melt plastic parts or cause the sytem to over heat.
If you have purchased a computer for your children to use we recommend it be placed in an open common area of your home. This can help you avoid some of the darker sides of the internet. If you still plan to install it in there room, care must be taken to instruct them in the proper use and care of the system, including the dangers of giving out personal information as well as electrical fire and electrocution if the cords are not properly handled. In addition all Computer systems including laptops must have cooling vents and things should never cover them or be placed into them.
Unpacking
Before you do anything with your new computer, there are several preliminary matters that need attention:
When you unpack your PC, make sure that all the components you
ordered are
enclosed.
Save the boxes in case there is a defective part that needs to
be returned.
Record the serial numbers from all components.
Fill out all warranty and registration forms and mail them to
the company that
produces the component. In most cases, at least some of the components are
produced by a third-party vendor and they are covered by a manufacturer's
warranty.
Buy a line conditioning power strip that acts as a surge
protector or a battery backup unit (UPS). This is an item
that can protect your investment against damage from electrical surges. A surge
suppresser
or battery backup unit is not necessary to run your computer, but it is strongly
recommended.
Front Face Controls
Many of the newer systems do not have all of the features listed below and may have new features not yet documented here. Please do not be concerned if your system does not have all of the features you see here, many are outdated and are no longer needed in the modern computer. It is always best to contact your computer manufacturer before making changes.
There are several switches or buttons on your computer that you should be familiar with.
These
switches are usually located on the front of your PC and are:
POWER BUTTON
When the power button is pressed your computer will turn on.
SLEEP BUTTON
Many new system have a sleep button. This button puts the system into a low
power mode that is faster to start than a full shutdown. Most Vista laptops have
the start button set to put the system to sleep rather than turning it off. To
turn a vista laptop all the way off you need to click the advanced shutdown
button and choose shutdown from the menu.
WI-FI SWITCH
Many new laptop systems have this switch. If you connect to the internet using a
wireless connection this switch must be turned on. Sometimes this switch is a
combination of key strokes like holding down the FN key while pressing one of
the function buttons while other systems have an actual switch (some might use
both). Refer to your manual for the exact position and use of this switch.
RESET SWITCH
If your computer should lock up and you can't reboot from the keyboard, you may
reboot using the reset switch. Not all system have this switch or button.
Plugging It In
Make sure that the power switches for all of your components are in the off
position. If you are using a surge protector, put its power switch in the off
position. You may leave the system unplugged for these steps.
Follow the instructions below one step at a time, connecting each device and going on to
the next. If this is the first time you are setting up a PC, don't worry! If you plug a
device into the wrong place on your PC, you will not destroy your system, but don't try to
force it. You may bend a pin on the connector. Try to find the right place that cord can
connect to that has the same shape and size connector. When setting up your system, a good
rule to keep in mind is:
"lf it fits, it probably goes there."
You may plug the power cords in after you are finished attaching the devices to the PC.
Figures 1 and 2 show typical layouts for the back of a desktop PC and a Tower PC.
Some connectors may be
placed in different slots. Use the pin configuration to identify a particular connector.
(A
parallel port for a printer would be a 25-pin female connector). Connectors are covered in
greater detail below.
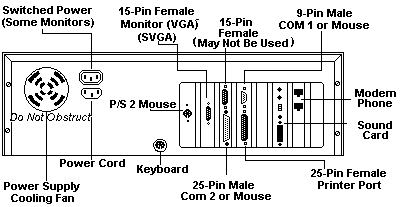
Fig. 1 Back view of a desk top system
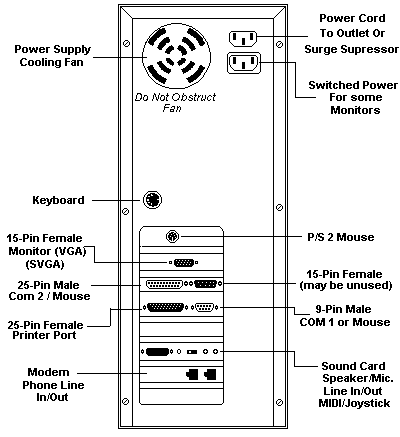
Fig. 2 Back view of a tower system
Your monitor comes with a cable for power and a cable that
connects to your PC.
Depending on the model, the power cable has either a standard three-prong plug for
standard electrical outlets or an adapter to plug into the power supply of your PC.
The cable that connects to your PC has either a 9 or 15-pin male connector on one
end. (A male connector has pins that stick out and a female connector has
holes to
accept the pins).
Find the female 9 or 15-pin connector on the back of your PC, press the male
connector firmly in place, and tighten the retaining screws on either side of
the connector (do not over tighten). The other
end of the cable, if it is not permanently attached, plugs into the back of your
monitor.
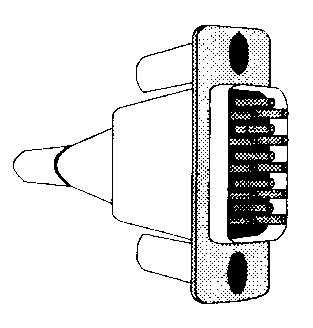
Fig. 3. Male monitor connector
KEYBOARD
The keyboard has only one cable, which is permanently attached at
the keyboard. The other end may have a round male connector with a notch for orientation or
it may be a USB connector.
Find the female counterpart to this connector on the back of your PC. It is probably
located in the center. Press the connector firmly into place. It may be necessary to
rotate the connector as you gently push, until the correct pin position is found.
The USB version can be plugged into any of the empty USB slots on the back or
front of the computer.
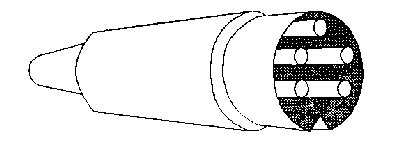
Fig. 4 Male keyboard connector
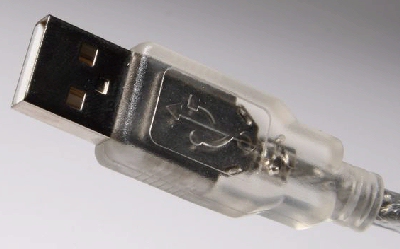
USB type A connector may be used for mouse keyboard or printer
PRINTER
every printer has at least two cables. One has a standard three-prong plug that fits into
any
standard electrical outlet. The other cable is for communicating with your computer.
For set-up purposes there are three kinds of printers: serial printers, parallel
printers or USB. Serial printers are no longer very popular. Whether a printer is serial or parallel
or USB has nothing to do with the printing
method. A printer can be laser or dot matrix, and can be connected using either serial, parallel
or USB cables.
The difference between a serial printer parallel printer or USB is how information is
passed from the PC to the printer. Parallel and USB printers accept information much faster
than the old serial printers. Your printer may have the ability to run in either parallel serial
or USB. If it does, parallel or USB is normally the better choice.
PARALLEL PRINTER (very old, most are now usb or WiFi connected)
If you have a parallel printer, the cable that goes from the PC to the printer
has an odd-looking connector, called a centronics connector, on one end. The other
end has a 25-pin male connector.
Press the 25-pin male connector into the 25-pin female connector on the back of
your PC and tighten the mounting screws. If there is more than one female
connector on the back of your system, choose one and test it later.
Find the centronics connector on your printer and press the cable firmly in place.
Press the mounting clips toward the center until they click into place.
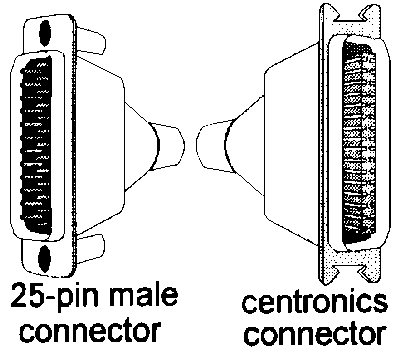
Fig. 5 Parallel printer connectors
USB PRINTER
Most new printers use the USB connection. When you purchase your new printer
be sure it comes with the cord, otherwise be sure to get one that fits your
printer.
POWER CORD
Your PC has a power cord with a three-prong plug that fits into any electrical
outlet.
It is strongly recommended that a line conditioner or surge suppresser be used to protect
you system. The other end has a female plug that fits into the back of your PC.
(There is also an auxiliary power source on the PC. Some monitors draw electrical
power from this adapter).
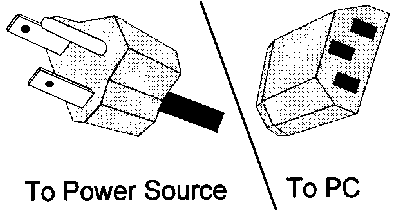
Fig. 7 power cord
Mouse
Your mouse is a serial device and will have either a round PS/2 or a
rectangular USB connector for attachment to a PS/2 port
or USB port on the computer. If necessary, you can use an adapter to connect your
PS/2 mouse to the
USB port.
NOTE: After you have connected all of your
devices, there may be unused
or open connectors on the back of your PC. This is normal and allows you to add
new devices to your system .
CD-ROM DVD
If you have a CD-ROM in your system, it will be installed and configured before
you receive your system. You do not need to connect your internal CD-ROM. The
CD-ROM in your PC operates almost identically to an audio CD-ROM. There are
no play buttons on the CD-ROM drive, it is controlled by the software in your system,
however most CD-ROM drives have an eject, volume, and headphone connection.
This drive is normally designated as drive D. You can use the file manager in
Windows 3.1, the Explorer in Windows 95 the DOS Shell, or commands at the
DOS prompt to view and run programs on a CD.
The primary difference between a read only CD-ROM and a hard disk or diskette is that you
may
not write information to the disk for storage. You may, however, use the information and
copy it to
another medium. This is typically how large volumes of clip-art and fonts are used and
stored. New
writeable CD-ROM units are available, but the cost is greater.
There are two basic types of CD-ROM drives: caddy and tray. Which type you have
depends on the particular model you purchased. The exact location of the controls
may also vary. Below you will find a figure of a tray type. This is the type that is
most common today.
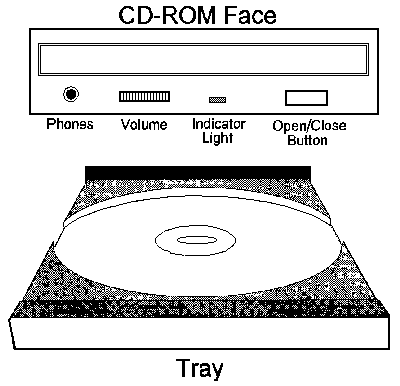
Fig. 9 CD-ROM
SOUND CARD
If you ordered a sound card (board) or a multimedia system, you must access the
jacks for input and output on the back of the system. A sound board fits into an
expansion slot in your PC and is only accessible from the rear.
Some sound cards have a thumbwheel on the card for volume control, and some do
not. To control volume, you must either use the thumbwheel, or keyboard controls.
(See your sound card User Manual for more information). You can not adjust the
volume using the CD-ROM.
Your speakers are plugged into the back of the card in the hole marked "line
out" or
"Speakers." There are usually only three choices, finding the correct hole
should not
be difficult).
The speakers are not plugged into separate right and left outlets. They are
"daisy
chained," which means that one is plugged into the jack on the sound card an the
second speaker is plugged into or is attached to the first. Depending on the speaker set that comes with
your
system, they may be permanently connected.
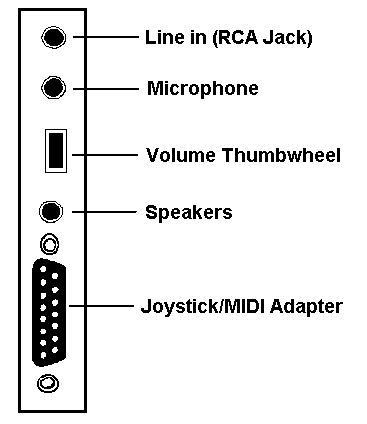
Fig. 10 Sound card
Section II
1. To start the system, begin by turning on the main power switch
at the voltage regulator, power strip or battery backup unit if you are using one. This will give
power to the monitor, printer and other
items such as the speakers and scanner. If you are not using a power strip just
turn on all of them from the power buttons on the devices themselves. Then press the "On" or "Power"
button on the CPU (central processor unit) to begin the "boot up" process and
finish starting the system. You will see a black screen with system settings scroll by and
then a Windows screen will appear. The process is complete when the Windows desktop and
start button appear.
2. To shut down the system, begin by closing all open programs. This is done by
clicking on the X in the upper right corner of each open window. After closing all open
programs, check to see if any buttons remain on the "start bar" next to the
"start" button. If there are buttons, you still have open programs. Click on
each, and the program will maximize itself. You will then be able to see the X to finish
closing the program. After all programs are closed, click on the start button on the lower
left of the screen, a menu will appear, then select "shut down" by clicking on
it. The screen will dim and a confirmation window will appear, check that "shut
down" is selected and click the "ok" button. Launching Programs and
doing things with your computer
After your computer is up and running (see above) you will want
to run a program. Programs are also known as applications and they come in all shapes and
sizes. There are programs for connecting to the Internet, for playing games,
word-processing, accounting and many more. Your Computer works because these programs
instruct the different parts of the computer to do things like printing or making a sound.
By combining many programs together and letting them run simultaneously, you can create
things like books, letters, e-mail, sound files or even just a painting. Begin by deciding
what you want to do. Do you want to write a letter, or paint a picture? Perhaps you want
to connect to the Internet. As an example we will start with writing a letter. For this we would
want to use a word-processing program. Windows 98, XP and Vista come with 2
basic word processors. The one we
will use in this example is called WordPad.
2. To enter text click on the blank area below the menus and
check for the flashing cursor, It will be a vertical bar. Once you locate the
cursor and it is in the blank area you can begin typing. The word processor
works much like a typewriter with just a few quirks. When you type, the words
will automatically wrap to the next line when you reach the right side of the
page and you can just keep typing. If you want to force the text to go down to
the next line or to create a paragraph you press the enter button and the cursor
will drop down one line for each press of the enter button. 3. If you make a mistake you can use the back button to delete
what you have just typed. If you notice the mistake in the text after you have
typed a long sentence or a full paragraph, or you just want to change what you
typed you can use the mouse to place the cursor next to the letters you want to
change and then use the back button or delete button to remove the text and
retype it. When you are finished typing you will usually want to save the file
for use later or printing. 4. To keep the work you just completed and to use it
again in the future you need to save the file on your computer hard disk or some
other place like a floppy disk or usb external drive. It is also important to
save a file several times while creating it because if your computer crashes you
will loose any work you have done that was not saved. To do this you need to
know a little about how and where files are stored on a computer. Computer
systems store data in files using a name and location you choose. Different
types of programs store the data in different kinds of files and that is called
the file format or data type. When you send a file to someone else it helps to
tell them what type of file it is and the program you used to create it. When a
file is stored the computer must also know what type of program created it so it
can use that program to open it again. This is accomplished by using a proper
file name and location. We will discuss the location part later. The file name
is important for several reasons. First it helps you find and identify the file
again and second it tells the computer what program can be used to open that
file. Because of this a Windows file name is made up of two parts. The parts of
the file name are separated by a period or dot. The first part of the filename
before the dot is for the user, it helps us identify the file. The second part,
the part after the dot is called the extension and it is the part that helps the
computer know what program to use to open the file when you want to use or view
it again. An example of a file name would be: myfile1.doc as you can see
the first part of the file name "myfile1" can use both letters or
numbers and some special characters can also be used but be careful, not all are
allowed. The second part of the file name "doc" is the part after the
dot and it is called the extension. This is the part that helps the computer
know what program to use to open the file. In this instance the computer will
open the file using a word processor because the extension is doc. In the past
all windows and DOS computers used file extensions that were only three letters
or less long, but now with the new Microsoft office 2007 programs an extra
letter has been added to the extension. (other types of computers may or may not
use extensions and your windows computer may not be set to show you the
extension, if yours is not set to show the extension you may want to change that
setting) You can tell if someone has sent you a word document in the new file
format because it will have the extension ".docx" instead of just
".doc" after the first part of the file name. Other programs use
different extensions. The Microsoft spread sheet program called Excel uses the
extension .xls and the new Excel 2007 program uses .xlsx. Many photo programs
and digital cameras use the extension .jpg when they save a picture. This
is a link to a site with many of the common extensions. Now that you know
what makes up a proper file name we can move on to how and where to save your
new file. 5. To save a file on your computer after creating it in
a program like a word processor you will have to use the menu bar at the top of
the screen. In our example using the Wordpad word processor you would click on
the menu item "File" at the upper left of the Wordpad window using the
left button on your mouse. Once you click on "File" a list will drop
down with about 10 items in the list. One of the choices will be
"Save" and another of the choices will be "Save As". The
very first time you save a new file you will always want to use the "Save
As" choice. This will allow you to give the file a name and it will let you
choose where to save the file. If you just click "Save" the first time
after creating your file your computer will give the file a generic name like
"document1" and you may not know where the file was saved on your
computer. The "Save" command is only used after you have used the
"Save As" command to name your file and will then use the name and
location you choose using the "Save As" command every time you click
"Save" in the future. To continue with our example click on
"File" in the upper left of the Wordpad program window and then choose
"Save As". A new window will come up and in it you will have a place
to enter the name for your document and a choice of where to save it. By default
most word processing documents will be put in the "My documents"
folder on computers running windows xp and the "documents" folder on
computers running windows Vista. For now we will not worry about how to change
the location of where the file will be saved, just take a look at the location
to be sure it is going to the default place like "My Documents" or
"Documents" and then type in a name for the file and click
"save" in the "Save As" window. The window will close and
leave you with the program running so you can continue your work. If you
would like more details on using a program you can click on the menu Item
"Help" at the top of the program window and a window with help
documents will come up. When you have finished working on the file you can close
the program by clicking on the X in the upper right corner of the program
window. To work on the file again you will have to open the program again from
the start button and then choose "File" from the top left menu and
then "Open" from the list. You should see the file you created listed.
Click on the file and then click on "open" and you will see your work
in the program. If you have a printer connected to your computer you can also
print. Windows 3.1 rolodex cardfile You must have a legal copy of Windows on your system and then
you will need to download 2 files and place them in your windows folder for the
rolodex to work. You will need the files: cardfile.exe (the
program) and cardfile.hlp (the help file.)
Click on these links and you will be asked what you want to do. If when you
click on cardfile.hlp you only get a page of code, try downloading it by right
clicking on the link above and then chose "save target as" and place
it with the cardfile.exe file in the windows directory. Once you have
downloaded both of these files, using the explorer, or my computer, locate the file
cardfile.exe in the windows folder and
double click it to start the cardfile program, or create a short cut to it on
your desktop for easy access later. Remember, the cardfile help system is only
accessible by clicking the word help form the file menu while the cardfile
program is up and running.
If you would like to download both programs at the same time please click this
link to the ZIP file "cardfile.zip" you will need winzip or some
other unzipping software to open the file.
Many people have had problems running this version on Windows 7 64bit computer systems. That is because it is a 16bit program. Microsoft created two versions of the program. A 16 bit that came on Windows 95 and 98 and a 32 bit version that came on Windows NT systems. The 32 bit version will run on Windows 7 64bit systems, but the help file does not work. Click here to download the 32bit version of Cardfiel.exe.
Viewing PowerPoint files
PowerPoint is a slide show presentation program from Microsoft. If you do not own the program you can use the free PowerPoint viewer to view PowerPoint files created by others. You will not be able to edit or make changes to the files, but you will be able to view the entire slide show including sound. If you would like to view PowerPoint files, download the file by clicking the link and then installing the viewer on your computer. Click here to download the PowerPoint viewer.
Internet connection problems
If you are having trouble accessing the internet, but you could access the internet without trouble in the past, you might want to try refreshing your IP address (think of it as your computer's name on the network).
If you are using Windows 95/98/ME, click the Start button, then click Run. In the "open" field, enter "winipcfg" (no quotes). Once the IP address window appears, select your ethernet card from the dropdown list, and click the "Release All" button. Once the numbers in the window are reset to zeros, click the "Renew All" button. It might take a few minutes for your computer to respond to the buttons; don't click the buttons more than once!
If you are using Windows NT/2000/XP, click the Start button, then click Run. In the "open" field, enter "command" or "cmd" without the quotes. On the prompt line, type "ipconfig /release" (no quotes space before /). When the prompt appears again, type "ipconfig /renew" (no quotes space before /). Once finished, type "exit" in the prompt line.
If you have any questions, call North Shore PC at 847-966-1044.
IPConfig is a command-line utility that prints out the TCP/IP-related configuration of a host. When used with the /all switch, it produces a detailed configuration report for all interfaces, including any configured serial ports (RAS). Output can be redirected to a file and pasted into other documents:
![]()
We are located in Morton Grove IL. and service most of Chicago and the northern suburbs. You can E-Mail us at NorthShorePC@aol.com by clicking on this mail link, or you can call us direct at (847)966-1044. Our hours of operation are 7:00am to 7:00pm. We also offer 24 hour emergency service.
![]()
Don't forget to back up your hard disk. You never know how much you need it until it's gone!
![]()
![]()
![]()
![]()
Best experienced with
![]()
Click Here to start.
![]()
![]()